Saturday, April 30, 2011

Soba-squash stir fry with tahini-soy sauce

Breakfast: Parfait with cooked apple pieces and honey

Lunch: Leftover curry – even better than last night!

Dinner: Soba-squash stir fry with tahini-soy sauce


Day-after meals are so good sometimes. It’s so time and cost efficient to cook a big batch of food and have it feed you for several times, so give it a go next time you’re making a curry, a pasta dish or chili.

Last week we had our housewarming party and my awesome friend Marcos brought me a wicked cookbook called The Everyday Vegan. Just reading through it made me hungry and I can’t believe it’s taken me a week to make something inspired by the recipes!

In Sydney we used to make stir fries with soba noodles and tahini sauce, and it was everyone’s favourite meal; light, full of flavour and so, so good for you. You were left feeling full and complete, with heaps of energy. Tahini is the stuff they put in hummus; it’s basically sesame seed paste and is a good source of both protein and iron, as well as calcium, which is good news for vegans.

This sauce, adapted from a recipe from The Everyday Vegan, is a variation on the tahini sauce that we used to make. The soy sauce changes the taste of the tahini completely. This was thrown together haphazardly and ending up being super quick to make, and so good that someone who had claimed not to be hungry ending up eating half my meal.

You’ll need:
(Feeds 2)
            Butternut squash, cut into small chunks
            2 medium tomatoes, chopped
            2 medium onions, chopped
            2 cloves garlic, crushed
            1 zucchini, halved and chopped
150g firm tofu, cut into cubes
            2 servings of soba noodles (they usually come tied in single servings)
            oil / sesame oil

For the sauce:
            1/2 cup tahini
            1/3 water (or more, to your desired consistency)
            juice of 1/2 lemon
            handful of fresh parsley, chopped
            2 tbsp soy sauce
            1 tbsp rice vinegar
            2 tsp honey
            a sprinkling of cayenne pepper

Method:
            Mix all the sauce ingredients together in a bowl and set aside
            Put the noodles in a pan filled with water, and bring to the boil
            Cook for a couple of minutes, just until they have gone soft, then quickly drain
            Fry the onion and garlic in the oil til they’re browning
            Throw in the squash and cook for 5 minutes until all pieces are soft
            Add the zucchini and tofu and cook for 3 more minutes
            Throw in the soba noodles and the tomatoes, and 2 tbsps of the tahini-soy sauce
Mix everything then serve up, with a good dollop of the sauce on top – leave the rest out for people to add more as they like!
           
It might seem odd to use tomato in this recipe, but actually tomatoes are a staple of most Thai stir fries and add a depth of flavour along with the usual root vegetables.

Soba noodles are a type of Japanese buckwheat noodle, and they’re medium-dark brown in colour. You can get them at all Asian grocery stores (usually for way cheaper than supermarkets) and they are a mainstay of our kitchen!

Friday, April 29, 2011

Spinach, chickpea and eggplant curry

Breakfast: Banana and blueberry breakfast smoothie (has oats in for an extra kick!)

Lunch: Veggie bento box from Aji Sai

Dinner: Spinach, chickpea and eggplant curry with lentil dhal and rice


The sushi place near my work is pretty amazing; or rather, the amount of food you get for $6 is. The only problem is that the self-righteousness that comes with giving up the pleasures of sashimi is totally ruined by the guilt about the amount of packaging they give you. Aji Sai, you’re killing my smugness!


Many people over here don’t believe me when I say that curry is now the national dish of the UK, but anyone who’s been to Brick Lane or Manchester’s Curry Mile, or Birmingham, wouldn’t dispute that. Many dishes now available in the UK actually originated there, created by Punjabi or Pakistani immigrants to appeal to more western (read: bland) tastes. Chicken Tikki Masala, believe it or not, comes from Soho, or Glasgow, depending on what you read.

More than this, curry is cheap, healthy and easy to make. It lasts forever in the freezer, so a big batch can feed you for a while. Tomato-based curries can be very low in saturated fats, and almost any vegetable can be used in them. The mixture of spices is also said to be a very strong aphrodisiac, although the excess gas that they also produce tends to cancel this out, in my experience.

This is not my recipe; I wish I could remember where it was from, but if you’re looking for more curry ideas you could do a lot worse than checking out Madhur Jaffrey’s dishes on the BBC Food website

You’ll need:
(Feeds 4)
            1 kg fresh spinach
            2 red onions, chopped
            200g chickpeas, drained
            2 garlic cloves, crushed
            2 red chilis, sliced
            1 tbsp ground coriander
            1 tsbp cumin seeds
            1 eggplant, diced
            400g chopped tomatoes

Method:
            Boil the spinach for 2 minutes
            Drain, rinse with cold water and then squeeze
            Blend to a puree
            Cook the onion, chickpeas, garlic, chili and spices for 5 minutes over a high heat
            Add eggplant and cook for 10 minutes
            Add tomatoes, cover and simmer for 15 minutes
            Stir in the spinach puree and serve

Jasmine rice and lentil dhal go fantastically with this, and I wish we’d had some peshwari naan to go with it.

As ever, this tastes better after a day in the fridge, so your next-day lunch will be amazing.

Oh, and here’s that fantastic Goodness Gracious Me clip, as it's both relevant and hilarious.

Thursday, April 28, 2011

Home-made granola

Breakfast: Parfait with bananas, blueberries, yogurt and home-made granola

Lunch: Left over patty and couscous

Dinner: Spaghetti with tomato sauce and zucchini


I love granola. I just love it. For years when going out for brunch it would be my first choice; now I have it most of the week so weekends are free to get eggy.

Shop-bought granola can be hugely sugary and a bit crap, despite being really expensive. I got the idea of making my own about 2 years ago, and never looked back! Using flax seeds means that you're getting a good dose of fibre and omega-3 fatty acids, the latter of which can be difficult to get with a fish-free diet. Also, because this isn’t overly dry you can have it with fruit, with yogurt, or even just with a splash of soy milk.

Anyway, here’s the recipe. You can use whatever nuts you like, but these ones are my favourites – and I tend to use the macadamias sparingly because they’re both overwhelmingly flavoured and expensive! It’s dead simple and I usually make a big batch once a week and it will see us through a few breakfasts. It’s also wicked midnight snack fodder.

You will need:
            3 cups rolled oats
            1 cup almonds, chopped
            1 cup pecans, chopped
            1/2 cup macadamia nuts, chopped
            1/2 cup flax seeds
            2 tbsp unsalted butter
            1/2 cup honey
            1/2 cup coconut (optional)
            1/2 tbsp ground cinnamon

Method:
            Preheat oven to 160˚c and grease a baking tray
Melt the butter and honey together in a pan
Combine the oats, nuts, cinnamon and seeds in a bowl
Pour the melted butter and honey in, and mix very thoroughly
Spread onto the tray and bake for 30-45 minutes, stirring a few times
Once cooled, add in the coconut (if using)
            Store for the rest of the week in a closed container!

To make this into a parfait, simply layer in a glass with yogurt, honey and whichever fruit you fancy.

If – shock, horror! – you find yourself without any ground cinnamon, don’t worry! I find myself without ground cinnamon but with a ruck of cinnamon sticks way too often, and I’ve found a remedy for this situation: when you melt down the butter, break up a few cinnamon sticks and add them to the pot. The cinnamon will infuse the butter; add the honey too and it’ll be even better. You just need to strain the butter before you use it to get rid of the debris,

If you’re worried about the use of butter in this recipe, you could use margarine instead, but I would say this; the amount of servings you get from this recipe means that 1 small bowl of this would probably contain the same around of butter you would spread on a piece of toast. If your diet isn’t heavy in saturated fats this isn’t really a problem; remember, moderation is key and you should always look at foods in terms of health and nutritional density, not calories!

Tuesday, April 26, 2011

Spicy bean patties

Breakfast: Home-made granola with yogurt and blueberries

Lunch: Miso soup with noodles and tofu

Dinner: Spicy bean patties with couscous, grilled zucchini and carrot salad


Miso soup is great for vegetarians, as it contains a hell of a lot of protein. Despite the fact that in sushi places you get it as something of a starter, with noodles and tofu miso soup can be a very filling and warming main meal in itself. Throw a spring onion in and it’s prefect. Strangely, it’s also been reported to help fight against radition poisoning and was used as such in Hiroshima and Nagasaki. Mad, eh?

I first made these bean patties a couple of years ago for a BBQ we were having – though the eternal curse of having it rain on every party I throw means that they got cooked in the oven in the end. I have adjusted the recipe this time, with fantastic results!

You’ll need:
(Feeds 2)
            1 tin of kidney beans
            1 small red onion, chopped finely
            1 tsp ginger, grated
            3 tbsp breadcrumbs
            2 tbsp plain flour and more for the outside of the patties
            1/2 a small red chili
            1/2 tsp of cumin
            a pinch of cayenne pepper
            juice of 1 lime
            a handful of fresh coriander

            1 zucchini, chopped
            1 carrot
            1 tomato
            1 cucumber
            1 cup of couscous

Method:
            Mash the kidney beans with a fork until they’re somewhat pureed
            Add the red onion, grate in the ginger, and add the soy sauce
            Add the chili, spices and half the lime juice
            Add the breadcrumbs and mix well
            Add the flour a bit at a time; if it becomes too dry, add more soy sauce
            Chop the coriander and add this, mixing thoroughly
            Shape into 6 patties and cover with flour
            Set aside

            Dice the cucumber and tomato and put into a bowl
            Grate in the carrot
            Add a splash of soy sauce and the rest of the lime juice
            Stir well

            Put the couscous in a bowl and cover with 1 1/4 cups of boiling water
            Cover and leave for 5 mins

While this is happening, grill the sliced zucchini, making sure both sides are cooked evenly

            Heat some oil in a frying pan
When hot, add the patties and fry on a medium-high heat for about 4 minutes on both sides, or until each side is brown and they’re warm in the middle

Dish the couscous out onto the plates
Stack 2 patties on top of the couscous and top with a few slices of zuccini
Place some of the carrot salad next to this pile
Drizzle with sweet chili sauce, if that’s your bag (it most definitely is mine)
Enjoy!


Losing the traditional bread and serving these with couscous, grilled zucchini and the salad makes this meal feel very light while being nutritionally dense. It’s the first time I’ve made this whole meal but I’ll definitely be doing it again, and soon!

Maybe tomorrow?

Monday, April 25, 2011

Vegetarian nachos

Breakfast: Banana and blueberry smoothie

Lunch: Scrambled eggs with feta and spinach, on top of potatoes

Dinner: Nachos with veggie mince and refried beans with home-made pico de gallo and guacamole


(Just a note: If ever you find yourself with a stale loaf of bread, as I did today, don’t just throw it away. Stale bread is perfect for turning into breadcrumbs and storing in the freezer for when you need them, to make Hana’s Tofu Balls or something of the like. Be thrifty and waste less, people!)

This recipe comes courtesy of Putin, whose idea it was to try these nachos. The cooking may have been a joint venture but the concept was his. Thanks, Putin!

Now, a big plate of nachos is almost the national dish in Canada, or at least it can seem like that when friends rant about not being able to get decent tortilla chips in the UK, and whenever you mention Sneaky Dees to a Torontonian their immediate response is “Yeah, they do killer nachos.” I am not quite so insane on them, but thanks to my wonderful chef friend Chris I know how to make a great pico de gallo (salsa) and so was much excited to make this meal when it was suggested. I also wanted to try making a very simple type of refried beans, as I never had before.

I know that some vegetarians don’t like to use veggie mince, but I’ve been using it sporadically since I was a carnivore. We used it back then over beef mince because it was more convenient – you can use it from frozen, its cheaper, and takes flavours amazingly – and now it’s a great compromise when cooking for meat eaters as they don’t lose the texture they’re so familiar with.

Pico de gallo
You’ll need:
2 big tomatoes, diced
1/4 red onion, diced
1 clove garlic, crushed
juice of 1 lime
1 small red chili, deseeded
Handful of coriander

Method:
Mix together the tomatoes, red onion, garlic and the chili, allowing everything to get a little mashed if you prefer that consistency (as I do)
Stir in the lime juice and the coriander

Veggie Mince Mix
You’ll need:
340 veggie mince (Quorn or Yves are recommended)
1 large onion, diced
2 cloves garlic
300ml diced tomatoes

Method:
Fry the onion and garlic together for a couple of minutes, until they’re starting to brown
Add in the veggie mince, and fry for a couple more minutes
Throw in the tomatoes and stir, frying until all the liquid is gone and everything is mixed thoroughly

Easy Refried beans
You’ll need:
250ml kidney beans

Method:
Boil the beans with a little water
When they are cooked, mash – but not so they’re completely crushed, just so they’re mostly mashed. I like it so they have a little bite

Guacamole
You’ll need:
2 ripe avocados, halved, stones removed, peeled
1 small red onion, finely chopped
1 ripe tomato, finely chopped
2 garlic cloves, crushed
1 small fresh red chilli, deseeded, finely chopped
Juice of 1 1/2 limes
Special Putin sauce; something like Tabasco, or a chili sauce

Method:
Mash together the avocados, onion, garlic, tomato and chili until they’re well combined
Add in the lime and a shake of hot sauce
Enjoy!

The whole shebang
Feeds 2
You’ll need:
100g Tostitos!
60g Mozzarella cheese, grated – you can also use good cheddar
Good sour cream
Everything above

Method:
Preheat oven to 200c degrees
Start one layer of the chips on a baking tray
Top this with half the veggie mince mix
Top this with half the refried beans
Create another layer of chips
Top this with the rest of the veggie mince mix
Top with the rest of the refried beans
Finish by topping everything the grated cheese
Bake this for 10 minutes
Take out and top with the guacamole, the pico de gallo and finally the sour cream
Try not to eat too much

I really enjoyed this meal, but then again I don’t have the emotional connection to nachos that North Americans do, so to illustrate just how good this combination of foods was, I take a quote from the meat-eating, Ukrainian-Canadian nacho-loving Putin himself: “That was possibly the best nacho experience I’ve ever had.”

Strong words, my friend, strong words!

Ginger Cream Roll

Breakfast: Home-made granola with soy milk

Lunch: Huge Ukrainian Easter lunch (Христос воскресе!) including lots of potatoes, Vinaigrette (my favourite of the Russian salads) and vegetables, followed by my mum’s Ginger Cream Roll.

Dinner: Not a lot; Ukrainian lunches last about 4 vodka-filled hours and very much resemble Roman feasts but without the practise of regular vomiting to gorge more. This is optional.


Dating someone from the former Eastern Bloc means that we have a lot of that culture in family gatherings, especially when it comes to the food. I am catered for very well (although at first the idea that I didn’t eat meat might have brought a small heart attack!) and have loved trying all the Ukrainian dishes, a few of which I’ll be posting here very soon.

Though Easter isn’t a big deal for me, it is for that side of the family, so for the big Easter lunch I thought I should try and bring some of my home culture in as well. As I didn’t grow up a vegetarian I didn’t want to make a veggie main dish that no one would appreciate, so I thought back to our traditional family gatherings and considered something we’ve always done well: dessert.

This recipe was always a staple of the holidays in my house, Christmas especially, and despite the fact that there were always about 4 puddings, this recipe always had us reaching for a second slice (and has me secretly raiding the fridge at home). As far as I know this is a Kay Parry original, but I’ve made a slight tweak, using rum instead of the usual brandy as we had some left over from our housewarming the night before. Both work really well and this is so easy to make that you will feel almost ashamed when everyone likes it so much.

Update: I've been informed that this is in fact an Eileen Leeson original, or as we prefer to call her, Gromma. She also used to let me lick the bowl when she made epic coffee cakes when I was younger, and made forts in the living room out of chairs and blankets, and for all these things, I say thank you!

You’ll need:
            1 packet (about 100g) of ginger biscuits
            100ml of whipping cream
            Sherry/brandy/rum

Method:
Whip the cream until your arm is either shaking uncontrollably or refusing to move further, and the cream is forming peaks when you lift the whisk, and set aside
Brush a biscuit on both sides with the alcohol (liberally) and put a big dollop of cream on one side
Stand this biscuit on its edge
Brush another biscuit, put the dollop of cream on one side and stand it next to the other biscuit, so they are sandwiched together with one lot of cream in the middle
Continue to do this until you have a log of whatever size you want; I recommend using the whole packet of biscuits because this gets eaten fast!
Try to get an even spread with the biscuits; squish them together a little and let the cream spill out, as it will be covered with more cream tomorrow

The roll should look like this!
Put the log in the fridge overnight, uncovered
An hour or so before serving, take it out and cover the log on all sides with the rest of the cream
Place back in the fridge
When ready to serve, sprinkle with crushed up Flake or some ginger biscuit crumbs
Slice on an angle for unbridled joy

As I hoped, this went down a storm and was finished completely. For such a cream-heavy dessert it feels surprisingly light, until you’ve had 3 slices of it after wolfing down a plateful of roasted vegetables and stealthily polishing off a packet of After Eights all day long.

In fact, now I think of it, this dessert is actually nicer not eaten at Christmas.

As an interesting aside, this was accidentally placed in the freezer for a good couple of hours, and came out very much like an ice cream cake…which was also delicious!


Thursday, April 21, 2011

Home-made hummus!

Breakfast: Mango smoothie and granola

Lunch: Home-made hummus with crusty bread and dips

Dinner: Roasted squash, spinach and feta salad


I like to think that I’ve learned a few things on my short quarter-century on this planet (yeah, I know, shut up), and I think the most important is this: you can never eat too much hummus.

A big pile of home-made hummus and a French stick or, even better, some home-made bread is one of the most innocent pleasures left and makes for a great lunch in the summer. This used to get us through exam prep in uni when we’d all camp out in the back garden and gorge ourselves on knowledge and chickpea spread. Killer.

I would definitely have made some bread too had I not realised at the last minute that I'd left my loaf tin in Sydney. 

Just a note: if you have a good blender, especially a hand blender, this will be a walk in the park. If you’ve got a crap standy-uppy blender like mine, you’ll have to scoop out the hummus several times and put it back in to get it really smooth. Also, you might want to implement a rule stating that the person who cooks doesn’t have to wash up; bringing this up stealthily a few days before you plan to make the hummus will downplay any accusations of foul play as your poor friend / flatmate / partner hacks their fingers down to the bone to get that last bit of hummus from under the blades of the blender.

It’s totally worth their bloodshed – just keep that in mind.

You’ll need:
            800g tinned chickpeas, drained
            3 garlic cloves, crushed
            1 tbsp tahini
            3 tbsp olive oil
            the fresh juice of 3 lemons
           
Method:
            Puree everything together in a blender
            Add more oil, juice or tahini to reach your desired consistency

I try not to add salt to my cooking and I’m lucky enough to not crave it, but if you are a salt-lover, season away!

Wednesday, April 20, 2011

Hana's tofu balls

Breakfast: Home-made granola with blueberries

Lunch: Couscous salad with yogurt and mint dressing

Dinner: Hana’s tofu balls with spicy wedges


We all need comfort foods sometimes, and as Putin was killing himself with exams this week, I figured now was the time to crack out these bad boys. And potatoes; the Ukrainians love those potatoes.

For this recipe I have to thank my lovely Czech friend Hana. I worked on Hana’s sustainable farm for a week in the mountains of Perak in Malaysia and day in, day out, amid the breathtaking scenery and the crazy antics, she fed me a variety of fantastic foods, accommodating my vegetarianism and getting me addicted to a chocolate cake that will appear on here one day soon. I also got obsessed with these, and willingly imported the recipe back home. Hooray for Hana!

You’ll need:
            300g firm tofu, grated 
            4 cloves garlic, grated / crushed
            1 carrot or a handful of cabbage, both grated
            2 eggs
            about 3 slices of bread turned into breadcrumbs
            soy sauce
            juice of 1/2 a lime
            oil of your choice

Method:
            Mix all the grated ingredients together in a bowl
            Beat the eggs and pour just over half into the grated mix
            Add a splash of soy sauce and the lime juice
            Put the egg in a small bowl and the breadcrumbs on a plate
Grab enough mixture to form a small ball and squeeze it tightly in your hand. Liquid should come out and the mixture should stay together. If not, it is either too dry or too wet; add more egg or some breadcrumbs accordingly.
If it seems a good consistency, roll the mixture into a small ball
Roll the ball in the beaten egg, then in the breadcrumbs. Ensure it is covered
Set aside on a plate
Continue forming the balls and covering them until all the mixture is used up
If possible, put the formed balls into the fridge for an hour or more. This will encourage them to stay together when cooked.
When ready, heat a few centimeters of oil in a pan
When the oil is hot (but not too hot – be careful as spitting oil stings like a bitch!) place a few balls into it – as many as you can without them touching
Keep turning them until all sides are golden brown and crispy
To minimize the residual oil, hang in a strainer for a minute or place between 2 sheets of kitchen paper
Serve up with your chosen side and some dips; home-made hummus and sweet chili sauce are great!

Yes, these are deep fried, but these are the only things that I do deep fry; as I said before, everything in moderation. I’d be much more worried about my cake intake than the odd deep-fried tofu ball, to be honest.

If it bothers you though, you can shallow fry them, but it takes longer to get them cooked through and they tend to fall apart a bit more.

This goes fantastically with a fresh salad or some roasted vegetables, or a fantastic spinach dish.

Monday, April 18, 2011

Couscous with yogurt and blackberry compote

Breakfast: Couscous with yogurt and blackberry compote and a mango smoothie

Lunch: Sandwich of home-made hummus, gouda, tomato, greens and sweet chili sauce on rye bread….and a gluten-free carrot cake cupcake from Tea Tree with a bomb Columbian coffee. I was so happy

Dinner: Wilted spinach and marinated tofu with soy sauce, lime juice and red chili, asparagus and tomatoes


I know what you’re thinking: couscous is not a breakfast item. That’s what I thought.

I was at the unbelievably fantastic Cafe Martini in Sydney (which for 12 months was but a dangerous 15 minute walk from my front door) for the first time, pondering over their extensive brunch menu looking for something small and light. I picked their couscous with vanilla bean yogurt and rhuburb compote basically because I didn’t fancy eggs or bread that day.

Well, what an awakening I had. Under the blazing Sydney sun, the food was perfect. The textures play off against each other, as do the flavours and even the colours. I knew that the next time I was at Martini, the breakfast bruschetta or the vegetarian monstro would tempt me instead, so I began to have couscous and yogurt at home, and started to experiment with different fruit toppings.

This blackberry compote is very simple and just takes a bit of time; you don’t even need to watch over it that much, it's just a case of the occasional stir until it starts to thicken.

You’ll need:
            Plain or vanilla yogurt
            100g couscous
            400g blackberries
            4 tsps brown sugar
            2 cups water

Method:
Boil the blackberries, sugar and water together in a pan, then turn down to a medium heat
            Stir occasionally and keep simmering for 30 minutes
            The mixture should start to thicken up, and when it does, keep stirring constantly
When it reaches your desired consistency, take it off the heat. Remember that it will thicken up a little more when it cools too
Put the couscous in a bowl, with enough water to cover it with about a  centimetre extra on top
Cover the bowl with a tea towel and leave for 10 minutes         
Fluff the couscous with a fork, then put your desired amount onto a plate
Put your desired amount of yogurt on top, and top this with the compote; either warm or cold, its fantastic

Be sure not to let the compote cook for too long, otherwise you’ll find yourself in a jam (a ha ha ha!).

Couscous is good to have in your diet as a vegetarian as it contains vitamin B6, which is fundamental in the metabolism of amino acids, and because it has the same amount of protein as pasta. Plus it makes you feel all fancy and shiz.

Just a note on yogurt; a lot of people buy the “fat-free” ones with all the best intentions, but more often than not, these are rammed full with sugar which, once its in your body, turns into fat. You might as well get the Greek yogurt and just enjoy it.


Sunday, April 17, 2011

Roasted red pepper and ginger soup

Breakfast: Apple and blackberry smoothie

Lunch: Roasted red pepper and ginger soup

Dinner: VeggieliciousFresh; I love this place but I'll gush about it much more later


 When you are from a country that is cold, soups are your friend. When you are a poor-ass student, soups are also your friend. When you’ve been both and now have a bit more money but hate wasted food, you realise that, you know what, soups are still awesome!

When I was living in Fallowfield in Manchester I would go to the local Sainsbury’s on my way home from uni and head straight for the ‘reduced’ veggies section. I would buy whatever was there and go home and make smoothies and soups to my heart’s content, and they would feed me all week; heaps better than pot noodles or a takeaway from Gemini's and cheap to boot.

These days I do the same thing; over-ripe bananas are great for banana bread, soft apples can be made into a great compote to go on yogurt, and red peppers that are just the wrong side of perfectly ripe make this soup insanely delicious and cost-effective too.

The ginger here is a big help if you’re getting sick. I have recently refined this recipe a bit and I think it's massively better with a bit of a kick to it!

You’ll need:
            4 big red peppers
            2 big fat chunks of ginger
            500 ml hot veg stock
            1 large onion, sliced   
            2 cloves garlic, crushed
            chili flakes or 1/2 a small red chili, diced
            olive oil / sunflower oil

Method:
Place the red peppers on a baking tray whole and roast at 160 for about an hour, turning them over from time to time
If the skins are blackening in places and the peppers are sagging, they can be used. Feel free to leave them in longer if you prefer
            Optional: peel off the blackened bits of the skin and eat them. They’re amazing
Optional: Take them out of the oven and put in Ziplock bags to sweat for about ten minutes.
Fry the onion and garlic in the oil in a large pan, until the onions are softening but not browning
If you’re using a real chili, add this to the pan and fry
Take the peppers out of the bags and remove the stalks and innards; save the juices!
Cut the peppers into slices and add to the pan, along with the juices from the bags
Cook for a few mins, then add the hot veg stock
Bring to the boil and grate in the ginger
Simmer for 15-20 minutes
            Allow to cool, then blend thoroughly
            Bring back to the boil and add the chili flakes, if using
            Serve with toasted bread. A blob of plain yogurt also goes really nicely on top

This is great to put in the fridge and have the next day with crusty bread, especially if the weather has turned on its head and started snowing again, which it has done here. My cute spring dresses are not impressed at all!

Saturday, April 16, 2011

Chocolate-almond crepes

Breakfast: Chocolate-almond crepes and the good tea – thanks for the care package from the UK!

Lunch: Leftover brown rice salad

Dinner: Soba noodles stirfry


Ah, the lowly crepe. Ever since I first made these a few years ago I’ve been on a mission to come up with the most awesome fillings and make them ‘the thing’ I do best; being a one-woman crepe factory when you’ve got a houseful of partied-out friends definitely makes you popular for an hour! They’re such a treat but can be very light if done properly, and you’ll know if I like you because you’ll have had them already.

What’s the difference between a pancake and a crepe? Well, it’s all about consistency; a thicker batter will give those American-style pancakes that I’m not a huge fan of, and a thinner batter will give the gorgeous French-style crepes. I’ve still never worked out how they make the batter stay in those little cubes in the street carts in Thailand, then just melt them down and make the most amazing crepes. Perhaps I’d rather not know.

I got some almond butter yesterday and was stoked to use it in these. Almond butter is like peanut butter, but made from almonds (duh). When buying nut butter I always get the 100% nut varieties, because quite frankly, they’re just better! I try to never throw food away, and the melted chocolate here is made of some choc chips I had leftover from doing some photos for work a few weeks ago.

You’ll need:
            300ml milk
            1 large egg
            1 tbsp melted butter
            100g plain flour
            the good almond butter
            100g chocolate / chocolate chips

Method:
For the melted chocolate:
            Put a small pan containing a couple of cenitmetres of water on a medium heat
Chop the chocolate/choc chips and put them in a glass or ceramic bowl over the pan of water. The bowl you use should be bigger than the diameter of the pan, so it sits above the water by a couple of inches
As the water simmers, the steam will rise and heat the bottom of the bowl, melting the chocolate slowly
Keep stirring until the chocolate is melted perfectly, then remove it from the heat
If the chocolate starts to burn or go too gloopy, reduce the heat

For the crepes:
            Beat the egg in a jug
            Whisk the flour and milk in, a bit at a time
Add the melted butter and whisk thoroughly. It will be the right consistency when it’s thickening, but still runs off your whisk smoothly. Add more milk if it’s too thick
Put the frying pan onto a medium heat for a few minutes
            Turn up the heat under the frying pan and add a blob of butter to it
            As the butter melts, swirl it around so the whole bottom of the pan is covered
Lift the frying pan away from the heat, and pour some batter into the pan. Swirl it around the pan so the whole bottom is covered in a thin layer of batter, then put back onto the heat
Keep the frying pan moving a little; when the crepe moves freely inside the pan, and bubbles are trying to form, its time to flip
Flip!
Give it about the same amount of time to cook on this side. If both sides look a very light brown, it's done
Serve up and add the next bit of batter; you should do this as soon as possible, and keep the pan hot!

While the next crepe is cooking, smooth a layer of the melted chocolate onto one half of the crepe, and a layer of almond butter onto the other.
(You’ll probably have to flip the cooking crepe now)
Fold it in half, drizzle some honey or melted chocolate over the top, with a powdering of cinnamon, and give to your eager friend!
Serve up the next one and add more batter to the pan.
Keep going in this fashion until all the batter is gone; you should get 5 or 6 crepes from this recipe, and a kitchenful of happy buddies
           
As with the spring rolls, you’ll find your rhythm in this after a couple of tries. If your first crepe is too thick, use less batter for the next crepe.

Remember when making these that the first one will always look crap, so chef gets to eat that one. Once the pan has been prepped by that one, they’ll be perfect.

Anyone who ever stays at my house has free rein to request these; it’s actually illegal for me to say no.

Roasted veggies and brown rice salad

Breakfast: Old Faithful Smoothie (milk, banana, oats, honey)

Lunch: Chunky hummus sandwich and spicy black bean soup from Tea Tree on the Danforth

Dinner: Roasted veggies and brown rice salad with spinach and asparagus


I felt a bit Mother Hubbard this morning; going out the last few nights has meant that the fresh kitchen stocks have dwindled, and Oreos and flour on toast didn’t really tickle my tastebuds. Thank god for Old Faithful. Its so plain but so packed with flavour and energy that I feel bad for overlooking it whenever there’s any other fruit around.

Lunch was at Tea Tree, an amazing vegetarian / vegan café near our office. Its run by Erin, who’s only in her twenties, runs this place on her own and makes the best vegan cupcakes I’ve ever tasted. I go here all the time and highly recommend it to any Torontonians!

One thing that I’m always trying to eat more of is spinach. As meat contains a lot of iron, a poorly-balanced vegetarian diet can leave you with depleted iron reserves, and this can make you lethargic. I suspect it’s this that has give rise to the myth that all vegetarians are weak and have no energy.

Spinach is packed full of iron, calcium and fatty acids, and its also very versatile and cheap! Asparagus also contains protein and iron, making it a great choice for a veggie. To get the most out of these veggies they're best uncooked or very quickly cooked, so in this warming treat the spinach is fresh and the asparagus is quickly blanched.

You’ll need:
            1 cup brown rice
            1 large red onion, chopped roughly
            2 carrots, chopped
            1 green pepper, chopped
            A handful of small tomatoes, cut in half
            1 zuccini, chopped
            A big handful of spinach
            A handful of asparagus, chopped
            Oregano
            Olive / sunflower oil

Method:
            Preheat oven to 180˚c
            Lay the onion, carrots, pepper, tomatoes and zuccini on a baking tray
            Drizzle with oil and sprinkle with oregano. Make sure they’re fully covered
            Roast for 30-40 minutes
Cook the brown rice while they roast; I find that 1 cup of rice to 3 cups of water, simmering for 30 minutes works well
Drain the rice
When the veggies are roasted, toss them into the warm rice
Blanche the asparagus: put it into boiling water for 2 mins, then rinse under cold water and add to the salad
Rip up the spinach and throw it into the warm salad

I also drizzled this with balsamic vinegar, because I am a total ho for balsamic vinegar, and if there was any feta cheese lying around, I would have liberally (lies) added that too.

Any leftovers can be kept in the fridge for a refreshing lunch the next day.

Please note: if you’ve recently turned vegetarian, you’ll have noticed that you’re somewhat more gassy these days. That’s because of your fantastic digestive system. This dish will only “improve” that situation, so expect a fairly strong southerly wind.
 

Thursday, April 14, 2011

Avocado smoothie

Breakfast: Avocado smoothie

Lunch: ‘Fridge salad’: spring mix, kasha, cherry tomatoes, cucumber, beansprouts, dry-fried tofu and wilted spinach with a splash of balsamic vinegar.

Dinner: Vegetarian laksa


 I keep saying that I’ll get out of bed at 7 then despite all efforts to rouse me, I crawl out of bed at 8am.

This morning when I did manage to part from my good friend, the sheets, there was nothing jumping out at me as breakfast food; the granola was finished, the fat oats taunted me and toast didn’t seem too appealing. The only fruits we had were bananas and tomatoes (smug for knowing) but I noticed that Putin had bought some perfectly-ripe avocados and I figured that now was the tine to man up and try that avocado smoothie that sounded so weird.

Unfortunately, our new place is still sans-internet and having come across the recipe online, I’d forgotten to write it down. Nothing that a bit of inventiveness can’t fix though, eh?

You’ll need:
            1/2 cup plain soy milk
            half a big banana
            half a ripe avocado

Method:
            Put them all in a blender and go mad

When I stopped the blender, I had something around the consistency of really smooth guacamole, and it looked like it too. I had only really used about 1/4 cup soy milk so I would have probably thrown some more in to make it more liquidy, but there was none left, so I spooned the avocado mousse into a glass, took a deep breath, and tried it.

It was delicious!

The flavours of banana and avocado really compliment each other so you get a smooth but fresh taste that’s not oversweet. I had used a very ripe banana so there was no need for a sweetner, but if you like, you could throw some honey or agave nectar in there too.

I figured that if I was going to go the spoon route I might as well go all the way, so I chopped up some almonds and threw them on top. Heaven! I think that avocado and almonds might just be the combination of kings.

Note: this is quite nutritionally dense, so the amount I made was more than enough for me. However, if you’re having this after the gym, or morning bootcamp (Claire, you crazy woman) you might want to make twice as much, or have it with some cereal.

Fresh spring rolls

Breakfast: Oatmeal (porridge if you’re British!) with banana and honey

Lunch: Home-made cream of mushroom soup

Dinner: Fresh spring rolls, and lots of them!


For the first time in ages I had porridge today, and remembered that I don’t like the big fat oats you get from Quaker, but they’re bought now, and I will eat them! No waste in this household!

For years I’ve been a fan of oatmeal for breakfast as it gives you heaps of energy, sees you through til lunch time no problems, and in a Canadian winter, gives you some much needed “central heating”. Any runner (which I am most definitely not) will extol its virtues over and over again. I remember scoffing down a bowl of porridge the size of my own head at 6am before I struggled through the Yonge Street 10k Run with Tom Anderson, and it fuelled me the whole way.

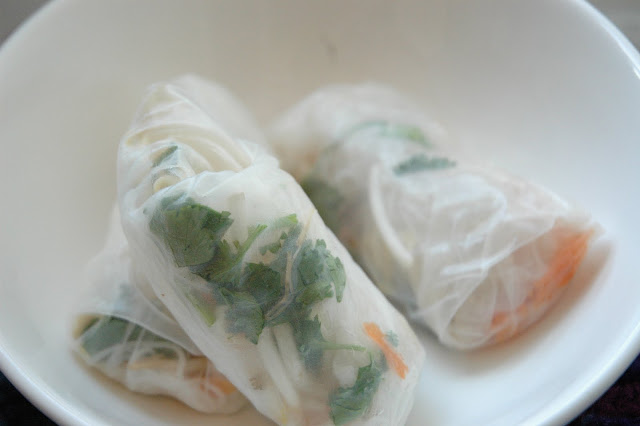
I made way too many vermicelli last night (slightly on purpose) so today I bounded off to the Asian grocery across from our apartment to pick up some rice paper so I could use them up in my favourite way. I love spring rolls but I can never eat more than 2 at a restaurant without feeling bad and trying to ignore the mounting grease on my fingers. I had never even thought about making fresh spring rolls until I attended May Kaidee’s vegetarian cooking course in Bangkok, and found out that with these treats no deep fryer is necessary! They’re super simple and taste both fresh and filing; perfect for spring.

You’ll need:
            rice paper
            cooked vermicelli noodles
            fresh coriander (cilantro if you’re North American!)
            beansprouts
one kind of grated or thin veggies; grated carrot works really well, as does baby corn, very thinly sliced red peppers or sliced chestnuts (available tinned)
            sweet chili sauce for dipping

Method:
To ready the rice paper:
            Fill a frying pan with cold water
            Submerge 2 rice papers in the water
Move them around slightly with your fingertips until they are moist; it only takes a minute or so
Quickly but gently lift one paper out and place in into a sheet of kitchen paper or a clean tea towel.
Put another kitchen paper / tea towel on top of it
Quickly and gently lift the other out and place on top
Put one more kitchen paper / tea towel on top of that and press down slightly
After a few seconds they’re ready to be used
To roll:
Gently lift the first paper and put it flat onto a plate. It will be very keen to stick to both you and itself so its best to do this as quickly as possible!
Place some vermicelli slightly in the top half of the paper, in the centre
Place a small amount of beansprouts, veggies and coriander on top of the noodles
Lift the top of the paper and fold it to just over the noodle pile
Fold in both sides; they will stick to the top of the other paper
You should now have a sort of envelope of foods with a long bit extending down
Grab the paper-wrapped food pile and roll it into the rest of the paper. This will create your roll, as the paper will stick to itself.
Set aside and repeat for the other paper
Voila! Dip and enjoy!


Be sure to wrap as tightly as you can. Your first roll will probably be a nightmare but after that you’ll have the hang of it! I recommend only doing 2 rice papers at once, as they tend to get too wet and fall apart if they’re left any longer.

You can also deep fry these; Putin suggested it and we tried it tonight. When fried in a few centimeters of hot oil they crisp up and taste much like restaurant fried spring rolls, except not as brown and obviously without any additional batter. They’re good either way, but I much prefer the fresh ones!

Huge props to both May Kaidee for teaching me how to do these originally, and to my fantastic chef friend Chris Leidy for reminding me how to wet rice paper and teaching me the proper way to roll. Chris works at a great restaurant in Melbourne and outside of work, makes some absolutely unbelievable Mexican-inspired foods. I was lucky enough to spend xmas with him once and it took me about a week to recover from the food coma he put me in (as well as a fairly seriously hangover). Thanks Chris!